This is a lightly edited transcript of the above Youtube video. It's the fifth part of a series on game development where I'll be building an entire game step by step and sharing the process in public.
This is the fifth episode in the Making Cyberglads series.
I'm building a game called Cyberglads using the Godot game engine.
In the last episode I introduced three NPC configurations, three named NPCs that the Player could fight against, with the temporary names Ernie, Bert and Kermit. Ernie is the easiest to play against, Kermit is the hardest.
But the player couldn't yet pick which NPC they wanted because the npc name was still hard-coded in the global script. I want that value to be set by the player before the start of the game.
Splash screen
The best place to do that is in a Splash screen with a few buttons. Let's create one now.
Create new scene with a TextureRect as root node (Splash) and save it in the scenes folder
I want the Splash screen to be the first thing the player sees so let's change the game's main scene and make it the Splash scene.
In project Settings > Run, set the Splash scene as the main scene
To make it less bland I'll add a starry sky as a background for my splash screen.
		Drag and drop background_large.png into TextureRect Texture property
		Make sure that Stretch mode is set to Scale on Expand
This isn't going to be super pretty. At one point I'm going to go back and design a good looking splash screen but at the moment I just want to put some basics in place.
Under the Splash node I'm going to add a VBoxContainer that I'll call NPCButtons. I want to have three buttons - one for each of the three NPCs, and I want them to be arranged vertically.
Add a VBoxContainer as a child node to the Splash node.
And now I'm going to add a TextureButton for each of the 3 NPCs that the player can choose from under my NPCButtons node.
Under the NPCButtons node, add three TextureButtons (create one and then duplicate it twice using ctrl+D)
I just add one button and used CTRL+D to duplicate it twice.
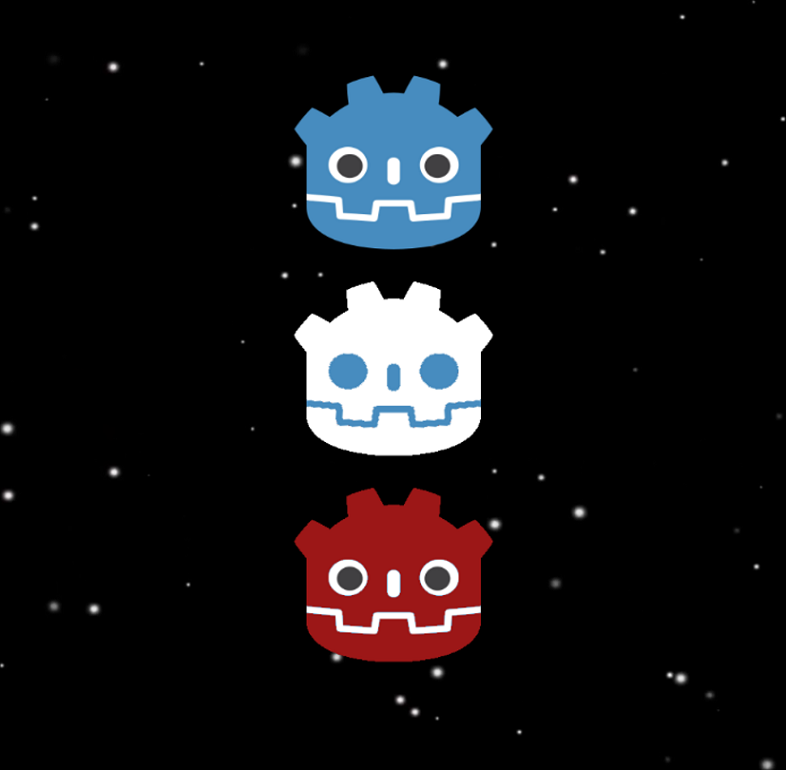
I'm using TextureButtons on the splash page instead of regular buttons so I can use these pimped Godot logos as buttons. You can have a normal texture and alternate textures for when the player hovers or presses the button. These little things are what give some life to an otherwise pretty bland first screen.
		For each TextureButton, drag and drop the appropriate texture for the normal, hover and pressed textures:
		Ernie: blue (normal) and white (hover/pressed)
		Bert: white (normal) and blue (hover/pressed)
		Kermit: red (normal) and white (hover/pressed)
I'm just going to rename the buttons so that they match the NPC name that each one will load the game with.
Rename the three TextureButtons to ErnieButton, BertButton and KermitButton respectively.
Before I start programming the actions behind each button I'm going to move my VBoxContainer to the right of the screen and I'm going to add some space in between the different buttons.
		Move the NPCButtons node to the right of the screen in the viewport, towards the center of the screen.
		Move the ErnieButton slightly upwards and the KermitButton slightly downwards to make some space. Try to keep things symmetrical.
I have the grid view enabled (even though you don't see it very well with the black background) and 'snap to grid' enabled, but aside from that I'm not overly careful how I arrange these buttons. As you can imagine this is a temporary layout for my splash screen.
When the player hits one of the buttons I need to set a global variable with the name of the selected opponent. First let's attach a script to the Splash node.
Attach a script to the Splash node, and save it in the scripts folder
Now let's connect a signal on each button. They should each trigger a separate function in the Splash script when the 'pressed' event is registered by Godot.
Add pressed() signal to each TextureButton, that should trigger a function in the Splash script
Now let's rewrite all three functions to set the npc_name in the global script (depending on what button was pressed) and load the Arena scene.
		Rewrite trigger functions and add load arena function:

		func load_arena():
			get_tree().change_scene("res://scenes/Arena.tscn")

		func _on_ErnieButton_pressed():
			global.npc_name = "Ernie"
			load_arena()

		func _on_BertButton_pressed():
			global.npc_name = "Bert"
			load_arena()

		func _on_KermitButton_pressed():
			global.npc_name = "Kermit"
			load_arena()
Game loop
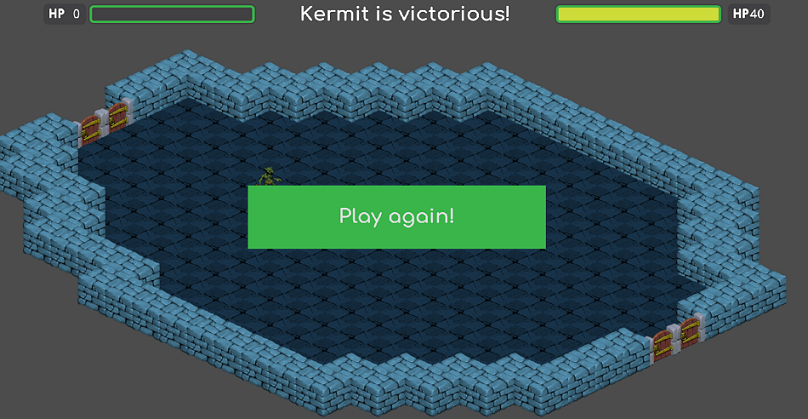
One more thing I want to do is put in place a loop so that the game proposes another fight at the end of the current one. A game is finished when either the player or the NPC dies. Whatever the result, a big 'Play again' button appears at the top of the Arena scene. It leads back to the splash screen to select a new opponent.
So let's go back to the Arena scene and add the 'Play again' button.
In Arena scene, add a Button field as a direct child node of Arena and call it PlayAgain
Let's add some text and change the button's font.
		Set the button's text to 'Play again'
		Change the font of the button (to Comfortaaa...) and font size 48
I want the button to appear in front of the Arena at the end of the game.
		Move the button down until it's at the level of the middel of the Arena.
		Problem: the button doesn't display because the Arena is in front.
I have a problem here. The Arena is in front of my button.
Let's fix that by using the z-index property on the TileMap. We want it to always display under everything else so we'll set its z-index value to -1.
Select the TileMap node and set its z-index to -1.
Ok we can see our button again, but let's change its size.
		Set its height and width to (700, 160). (in Rect > ...)
		Recenter the button in the middle of the screen.
I'm also going to change the button's color so that there's more contrast with the background. I'm going to choose the same color for the button's background as I'm using for the TextureProgress nodes just to have a semblance of harmony.
		Add a StyleBoxFlat to the Custom Styles > Normal property
		Change the StyleBoxFlat's background color to #39b54a
		Keep the font white (#ffffff).
Again, this isn't particularly pretty yet but I don't care at this point. I need the basic game to be functional. I'm going to change all the visuals in a future episode.
I'm also going to change the style of the button when it's hovered or pressed using a different color.
		Add a StyleBoxFlat to the Custom Styles > Hover AND pressed property
		Change the StyleBoxFlat's background color to #cddc39
		Keep the font white (#ffffff).
We do need to make sure that the button isn't visible by default, otherwise the player won't be able to see the arena while the game is in progress. It should only appear when one of the two characters die.
Uncheck the Visibility > Visible property of the Button node
Let's add a function to make the play again button appear.
The place to do this is in a script linked to the Arena's root node, but we don't have one yet so let's create it.
Attach a new script to the Arena root node and save it in the scripts folder.
We want a function that will toggle on the button's visibility property when called.
		In the Arena script, add a function:

		func show_playagain_btn():
			$"PlayAgain".show()
This new function should be called at the end of the game, so let's trigger it in a new end_of_game() function.
		And call it at the end of the end_of_game() function:

		func end_of_game():
			show_playagain_btn()
The game ends when one of the two characters die. When that happens we need to call this function. So let's add that call in the Character script.
		In the Character script, at the very end of the take_damage() function, add:

		get_tree().get_root().get_node("Arena").end_of_game()
We're calling a function by going back to the tree's root and selecting the Arena node. I'm not using a relative path to select the Arena node this time because I want to make sure that this code will still work even if the character nodes' position changes in the node tree at some point in the future.
The last thing we need to do is write the function that is called when the play again button is pressed. It should simply reload the Splash screen.
Let's connect a new signal from the PlayAgain button's pressed event to a function on the Arena script.
		Connect the pressed signal on the PlayAgain button to a function in the Arena script.
		In the Arena script, add:

		func _on_PlayAgain_pressed():
			# when button is clicked, switch to Splash screen
			load_splash_screen()

		func load_splash_screen():
			get_tree().change_scene("res://scenes/Splash.tscn")
Now that I have a function that is called at the end of the game, I'm going to take the opportunity to change the text in the HUD's message node. It doesn't make sense to keep saying "Let the best troll win" if one of them is dead. Instead, I want it to say who won the match.
Let's revisit our end_of_game() function in the Arena script.
		In the Arena script, add the following at the end of the end_of_game() function:

		# Boolean value, states whether the player has won (true) or the NPC has won (false)
		var player_won = $"TileMap/Player".state == 0
		var winner_name = global.npc_name
		if player_won:
			winner_name = "Player"
		$"HUD".end_of_game(winner_name)
In the Arena script we're deciding who won the fight based on the Player character's state at the end of the game. We're calling another end_of_game() function, this time in the HUD script.
It makes sense that the HUD should be responsible for changing the Message label, because Message isn't part of the Arena scene.
Let's add the end_of_game() function in the HUD script.
		In the HUD script, add a new end_of_game() function:


		func end_of_game(winner_name):
			$"Message".set_text(winner_name + " is victorious!")
Splash screens vary enormously depending on the type of game, the context and the medium. Splash screens can just act as a buffer to keep the player waiting for the game to start without getting too bored. They can also give the game designer an opportunity to get input from the player. For example, you can ask what difficulty the player wants to play at or how they want their avatar to look like.
Splash screens are also a good place to showcase your graphic design skills without being hindered by gameplay constraints, since the game hasn't typically started when you load the splash screen. Cyberglads doesn't feature any custom art yet, but I have a few ideas about how the splash screen could look like in the future.
In this sense the humble splash screen is sometimes a critical part of game marketing, because it's the first thing that the player sees and is often used in promotional material on Steam or on app stores.
Finally, a splash page can allow players to log into the game either with custom credentials or using their social media identity.
Here are a few examples of splash screens built with Godot. You can find the links in the video description below.
- Guideline by dbcoded has a nice classic mobile splash screen featuring the alien Strox and a couple of buttons.
- Brazilian game developer Gus made a cute splash page for his Flappy Mario World game.
- Deep Sixed by LittleRedDogGames has an original splash page featuring a rotating space station .
That's it for this episode of Making Cyberglads.
The current version of Cyberglads is available for download on the cyberglads.com website.
I'd be really grateful if you could give it a spin and try to beat all three NPCs. Let me know how it went for you and if you found them too easy or too challenging.