This is a lightly edited transcript of the above Youtube video. It's the third part of a series on game development where I'll be building an entire game step by step and sharing the process in public.
Hello and welcome to this third installment in the Making Cyberglads series.
I'm building a game called Cyberglads using the Godot game engine.
Last time I left the game in a state where we had an arena with a Player and an NPC. The Player character could move and attack the NPC following instructions from the player, but the NPC couldn't move or retaliate.
In addition, you could only know that the NPC's health was affected by the player's actions because it eventually died under an onslaught of attacks.
A few improvements
I'd like the player to see how many hit points each character has left at any point in time so I'm going to add a basic head-up display on top of the screen with a life bar for each character.
There's a good two-part tutorial on how to achieve this in Godot on the official website.
We're going to do something very similar here with a couple of twists, and we're going to reuse the graphics from the sample project temporarily until we make our own in a later video.
Container architecture
In this video we're going to make heavy use of container nodes. Containers are very useful in Godot in that they allow us to organise our user interface. Containers control how their child nodes are displayed in terms of their size and position. We'll use three different types of containers: MarginContainers that make sure that everything inside fits within margins, HBoxContainers and VBoxContainers that respectively let you organise content horizontally or vertically.
We'll start by creating a MarginContainer node that we'll call HUD, and save it as a scene bearing the same name.
Create new scene, add a MarginContainer node and rename it to 'HUD'. Save the scene.
I want my HUD to take up the full width of the screen, so I'm going to set its size in the Rect property in the inspector.
In the inspector, set the Rect > Size > width property to 1920.
Now we'll set the margin to 20 in all directions.
Select the Custom Constants property in the Inspector, and set all constants to 20
I'm going to add a Label node as a direct child of the HUD node that I'm going to call Message.
Add a Label node under the HUD node and call it Message
I'm going to use it to inform the player about the game's status. Let's put some silly text in there just so that we can see the label on the screen.
		Set Label text property to "Let the best troll win!".
		Select Label Custom Fonts property in inspector panel.
		Select 'New Dynamic Font', then load Comfortaaa bold font from file system panel.
		Set font size to 48.
"Let the best troll win!" Notice that I had to select a font and font size for the Label because there isn't anything defined by default.
Finally let's center the Message label in the middle of the HUD
Set the Align property to 'center' in inspector
Let's add a VBoxContainer that we'll call Bars that will contain the life bars of the characters (and their energy bars in the future). Inside we'll add an HBoxContainer called LifeBars.
		Add a new VBoxContainer under HUD, call it Bars.
		Add a HBoxContainer under Bars, call it LifeBars.
We're going to need two LifeBars: one for the Player and one for the NPC. Both LifeBars will be very similar. They'll need to have a label that says what they measure. They'll need a numeric field that displays the character's remaining hit points. They will also need to have some visual that represents these remaining hit points, that will have to change during the course of the game. The two LifeBars will look similar but will be set up symetrically in the head-up display, so there will be some slight differences between the two.
If you've been following along you already know how we're going to go about doing this in Godot. We're going to create a base Bar scene with everything we need to create a LifeBar, and then we're going to use two instances of this scene in the Head-up display.
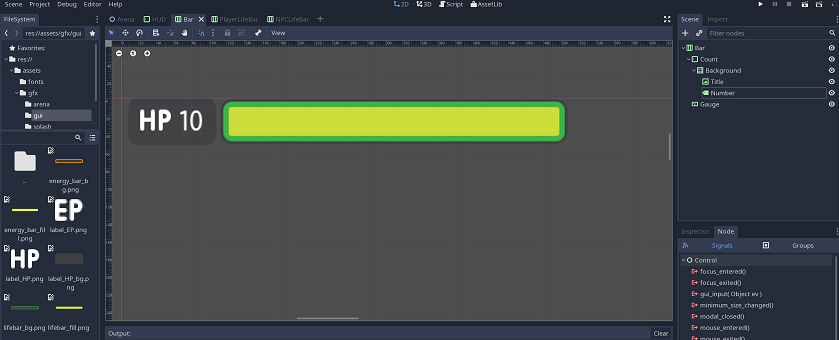
Let's create the Bar scene. The root node will be an HBoxContainer that we'll call Bar, and it will have two child nodes: one MarginContainer node called Count that will show the numeric value of the character's remaining health and a TextureProgress node that we're going to animate when a character takes damage. We'll call it Gauge. The Count node should have children nodes itself; it needs to have three elements - one TextureRect node for the "HP" label and one Label node for the number value. We'll also add a NinePatchRect node called Background just like in the Godot tutorial.
		Create new Scene (HBoxContainer) called Bar.
		Add child node to Bar (Control) called Count.
		Add child node to Bar (TextureProgress) called Gauge.
		Under the Count node, add new child node (NinePatchRect) called Background.
		Under the Count node, add a (TextureRect) child node called Title.
		Under the Count node, add a (Label) child node called Number.
I'm going to import the texture that was used for the HP label in the tutorial, so I just need to drag it into the Title node's TextureRect.
Drag "HP" texture into Title (TextureRect) Texture property
Let's do the same for the Background node
Drag and drop texture for the Background node (label_hp_bg.png)
I'm also going to change the Number node's font and set its initial value.
		Go to Number > Custom Fonts property.
		Click on it and select New Dynamic Font.
		Load Comfortaaa as the new font.
		Change the font size to 28.
		Set the default text to 10.
Next let's add Textures to the Gauge node. Again I've imported the textures from the tutorial. We have one for the life bar background, and one for filling in the progress.
		In the Gauge node, drag and drop the lifebar_bg.png file to the Texture > Under property.
		In the Gauge node, drag and drop the lifebar_fill.png file to the Texture > Progress property.
		Set the Range > Value property to 75.
I've also set the value of the Range property to 75 to see the Gauge filled in. We can even set it to 100 so it will look the way it should at the start of a game. The gauge will empty up as the character takes damage.
Set the Range > Value property to 100
So we've added all these textures, but you see that my Count child nodes are all squished together. I could try to move them around by hand, but that wouldn't work because of the parent container node.
Instead I'm going to start by setting the Background node's minimum size.
Set the Background node minimum size to (100, 40) in Rect > Min Size (eh, sometimes we need to do this at the Count level too for some reason)
And now I'm going to move the other two nodes under Count and make them children of the Background node.
Make Title and Number children of the Background node
That way Background will be the only direct child node left in the MarginContainer and I'll be free to mess around with the other nodes' size and position.
Now let's set the Title node's Stretch mode to 'Keep Centered' and set its size property to (50, 40).
		Set the Title node Stretch Mode to 'Keep Centered'
		Set its Rect > Size property to (50, 40).
And now we're going to position the Number node. We're going to select 'Full Rect' and align it to the right so that it takes its place on the right hand side of the Background node.
		Select Number node
		In the viewport, select Layout > Full Rect
		In the inspector, set Align -> Right and VAlign -> Center
Let's adjust the positions of the two nodes manually.
Adjust the positions manually to align the two nodes and leave a bit of padding on both sides.
Player and NPC life bars
The Bar scene is complete, but as I said we need two instances that will be similar but with some differences. I'm going to create two inherited scenes: one that I'm going to call PlayerLifeBar and the other that I'll call NPCLifeBar.
Create two inherited scenes from Bar and call them PlayerLifeBar and NPCLifeBar
The PlayerLifeBar already has all the right properties, but the NPCLifeBar needs to be reversed. So I'm going to select the NPCLifeBar, make sure to set sub resources as unique and then change the alignment to "End" to align the NPC's lifebar to the end of the box container.
Select the NPCLifeBar root node and set the Alignment property to End.
We're also going to change a property on the NPCLifeBar's Gauge node to make it fill in from right to left so that it behaves symmetrically to the PlayerLifeBar.
Set NPCLifeBar > Gauge > Fill mode to 'Right to Left'
What would also be nice is if we could reverse the order of the NPCLifeBar's Count and Gauge nodes to have a fully symmetrical HUD. The display order of nodes depends on the order in the scene tree.
But if I just change the order of the nodes in my inherited scene the change will be overrided by the inheritance, so I need to find another way.
I'm going to attach a script to the root node of my NPCLifeBar scene.
Attach script to NPCLifeBar, save it in scripts folder
Immediately upon entering the node tree I want the order of the nodes to be reversed so that the Gauge node becomes the top child.
		Add the following code to the NPCLifeBar script:

		func _enter_tree():
			move_child($"Gauge", 0)
Ok we have our two life bars as separate inherited scenes. Let's add an instance of each one under the LifeBars node in the HUD scene by using the instancing button.
		Add an instance of PlayerLifeBar under "LifeBars" in the HUD scene, call them "PlayerLifeBar".
		Add an instance of NPCLifeBar under "LifeBars" in the HUD scene, call them "NPCLifeBar".
To make sure that the player lifebar displays on the left of the screen and the NPC lifebar shows up on the right, we're going to set the width of the Bars and Lifebars nodes to 1920 (that's the full width of the screen).
Set the width of Bars to 1920 (in Rect > Size)
Next we're going to set the LifeBars node's Alignment to center and then set a separation of 700 pixels in the Custom Constants section in the inspector.
In Custom Constants, set Separation to 700
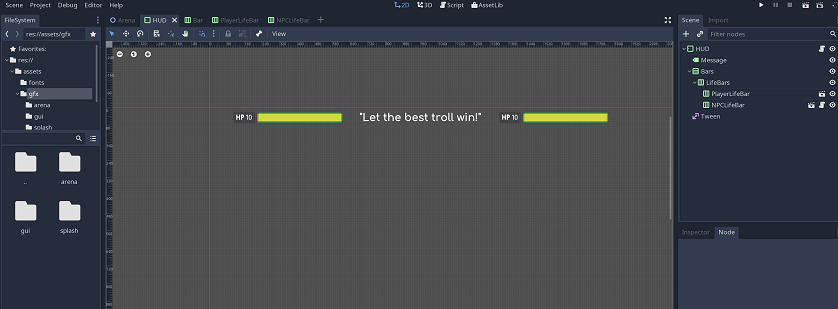
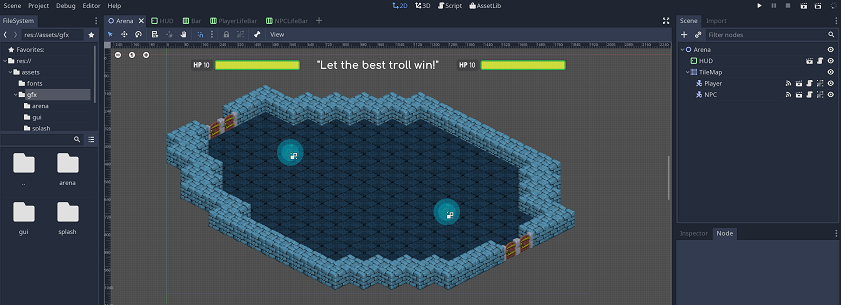
With this our HUD is complete from a visual perspective, so let's add it to the Arena scene.
Add an instance of HUD as the first child to the Arena scene (using the instanciating icon)
And let's run the game to see how that displays.
Animating the HUD
We see the HUD but what I'd really like is to animate the lifebars when one of the characters takes damage.
Before I start programming, I have to add a Tween node that will let us animate properties in other nodes in the scene.
Add Tween node as a child of HUD
Now let's attach a script to the HUD's root node.
Attach a script to the HUD root node (and save it in the scripts folder as HUD.gd)
I'm going to create a few attributes that will hold references to the Player and the NPC's amount of hit points and their Gauge nodes. I'll have another variable referencing the Tween node and variables to hold the state of the characters' health in the HUD.
		Add attributes in HUD script:

		onready var player_number_label = $Bars/LifeBars/PlayerLifeBar/Count/Background/Number
		onready var player_bar = $Bars/LifeBars/PlayerLifeBar/Gauge
		onready var npc_number_label = $Bars/LifeBars/NPCLifeBar/Count/Background/Number
		onready var npc_bar = $Bars/LifeBars/NPCLifeBar/Gauge
		onready var tween = $Tween
		var animated_player_health = 0
		var animated_npc_health = 0
These last two variables are the ones that the Tween will animate. They're decoupled from the actual hit points of the characters at any point in time.
Next step, I'm going to initialize the LifeBars with the characters' max health in the HUD script's _ready() function.
		Add the following code to the _ready() function:

		func _ready():
			var npc_max_health = $"../TileMap/NPC".max_health
			var player_max_health = $"../TileMap/Player".max_health
			npc_bar.max_value = npc_max_health
			player_bar.max_value = player_max_health
I'm getting the characters' max health from the respective nodes in the Arena scene. This is possible since the HUD is a child of Arena.
Now I need to write the function that will animate the two health values dynamically whether it's the Player who has taken damage or the NPC. This is where the Tween node comes in handy. You simply pass it a property name and the new value to animate towards. It will manage the transition.
		Add the following functions to the script:

		func get_animated_health(character):
			if character == "npc":
				return animated_npc_health
			else:
				return animated_player_health

		func update_health(new_value, character):
			var animated_health = get_animated_health(character)
			tween.interpolate_property(self, "animated_" + character + "_health", animated_health, max(new_value, 0), 0.6, Tween.TRANS_LINEAR, Tween.EASE_IN)
			if not tween.is_active():
				tween.start()
I'm going to call my update_health() function in two different ways. I want to animate the progress bars from zero to max health for both characters at the start of the game.
For that I need to call my update_health() function in the _ready() function, passing the characters' max_health.
		Add the following lines at the end of the ready() function:

		update_health(npc_max_health, "npc")
		update_health(player_max_health, "player")
The other circumstance where I want my HUD fields animated is when one of the characters takes a hit. We're going to go back to the Character script and emit a signal in the take_damage() function that is common to Players and NPCs.
		In the Character script take_damage() function, add:

		emit_signal("health_changed", health)
Also add the health_changed signal at the top of the script.
		At the very top of the script (after the Extends statement) add:

		signal health_changed
We need to connect that signal, so for both characters (Player and NPC in the Arena scene) we have to go into the Node tab and trigger a function in the HUD node when the signal is emitted.
Let's connect the two signals.
For both Player and NPC (from the Arena scene), go to Node tab and register the health_changed signal to trigger a function on the HUD node
Back in the HUD script, we're going to write the function that reacts to the signal. Let's replace the contents of the functions with calls to our update_health() function.
		Back in HUD script:

		func _on_NPC_health_changed(npc_health):
			update_health(npc_health, "npc")

		func _on_Player_health_changed(player_health):
			update_health(player_health, "player")
So far we've just animated the values of our two variables in this HUD script, not the progress bar and the Number field themselves. We'll take care of that in the _process() function.
Let's update it now.
		Add _process() function:

		func _process(delta):
			var player_round_value = round(animated_player_health)
			var npc_round_value = round(animated_npc_health)
			player_number_label.text = str(player_round_value)
			npc_number_label.text = str(npc_round_value)
			player_bar.value = player_round_value
			npc_bar.value = npc_round_value
We're modifying the properties at each frame based on the values of our two animated health variables. Let's test that it works.
Here I have a problem. Godot gives me an error when I try to run the game, saying that the NPC's max_health is null.
If you build a game you're going to have to fix errors like this very often. In these videos I'm mostly just showing the happy developer path in the interest of time, but programming is in large part a process of trial and error.
Ok so how come max_health is null here? If you followed the last video, you know that we're setting the max_health in the onready() functions of both the Player and the NPC scripts.
The onready() function is called by the _ready() function of the Character script that Player and NPC extend. The _ready() function in Godot is called when the element is loaded in the scene.
In Godot nodes are loaded in a scene from top to bottom. That means that in my Arena scene, the HUD is loaded before the Characters, so the max_health values are null when my HUD is loaded.
There are a few ways to fix this, but I'm going to use a global script to set the max_health value for both Players and NPCs. A global script lets you deal with data and functions that are common across scenes. It will come in handy later as well.
		In the Script tab of the viewport, select New and then create an empty script and save it at the following path:
		res://global.gd
The global script should be autoloaded; you can achieve this by adding your global script in the Autoload tab in your project settings.
Go to Project Settings > AutoLoad and add the global.gd script to the list of autoloaded files
Now let's add some code to the global script to set the max_health of both Characters globally.
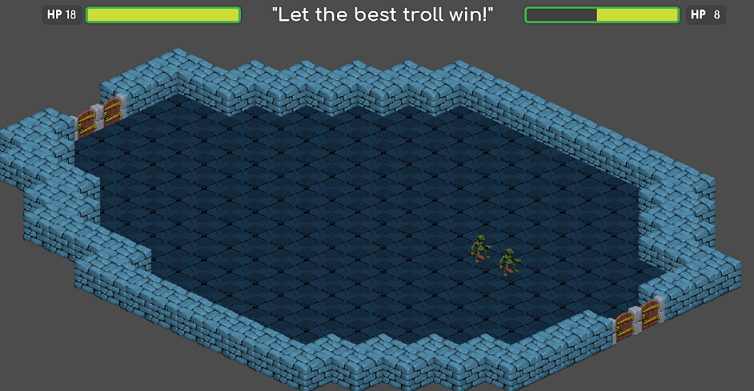
		Add the following code to the global script:

		func get_npc_max_health():
			return 15

		func get_player_max_health():
			return 18
That way my HUD can fetch these values from the global script.
		Go back to the HUD script and modify the relevant lines in the _ready() function:

		var npc_max_health = global.get_npc_max_health()
		var player_max_health = global.get_player_max_health()
When I run the game it works now.
We've added a head-up display to the game. It was fairly straightforward since all I basically did was follow a couple of tutorials and tweaked them for the purposes of my game.
Other HUD ideas
If you have some good ideas on how I could customize the Head-up display to make it more original let me know in the comments below or on Twitter.
Most people want a display that's informative about game state but that isn't too distracting and that doesn't take up too much screen real estate.
There's a variety of information that you could put in a HUD. A minimalist HUD would just feature the score, but you also have HUDs that are packed with information including maps and stats of nearby characters. Some HUDS are fairly static while others are animated and colorful.
You've probably seen HUDs that follow the game scene so thoroughly that they blend in, like the HUDs from Halo 4 and 5 that are displayed within the character's helmet. That can work in first person perspective (Cyberglads of course has a third person perspective).
Some HUDs only appear when state changes occur, others have a configurable look and feel like in One Piece: Burning Blood or Team Fortress 2. And of course some games got rid of the HUD completely to make the game more immersive.
And finally I want to mention a few HUD walkthroughs that use Godot. You can find the links to all of these in the video description below.
Fornclake from BanquetGames has a cool Zelda-Like tutorial series in Godot. I've linked to an episode where he populates the HUD.
Angega Studios built a Flappy Bird remake in Godot as well as a Space Shooter.
That's it for this edition of Making Cyberglads.
Tune in next time when things really get interesting. I'm going to let the NPC fight back! I'll be programming a basic AI to control the NPC.
In the meantime version 0.1 of Cyberglads is available for download on Windows via the cyberglads.com website. It already features the AI and a few more things that I'll be explaining over the next couple of weeks.