This is a lightly edited transcript of the above Youtube video. It's the second part of a series on game development where I'll be building an entire game step by step and sharing the process in public.
Welcome to this second episode in the Making Cyberglads series. I'm building a game called Cyberglads using the Godot game engine.
Building a game can be a daunting process if you don't know where to start, but thankfully Godot is easy to get into and there are tutorials that you can use as an initial scaffold for your project.
That's exactly what I'm going to do to kickstart Cyberglads.
Godot
This won't be a Godot tutorial exactly; there are much better resources out there like GDquest. There's also an excellent new Udemy course called Discovering Godot - Make Games in Python-like GDScript by GameDev.tv and Mike from Game From Scratch also has some good tutorials on Godot. These will all get you familiar with the engine so that you are able to get started on your own project, but my objective here is a little different.
I want to take you through the whole journey of building a game. I want to guide you through all the trials and tribulations, the decision making around high-level game design but also about the nitty gritty, all the different tools and technology and the creative process around building a fully fledged game.
Cyberglads will be a real time gladiator-type combat game where players face off against NPCs or against each other in tightly balanced encounters.
I've created a fresh project in Godot engine, and to get started I need to add my first scene. Godot is organised around Scenes, which work like a node tree. As we'll see this is a very convenient way to organise your game's architecture.
The Arena
The setting of the game is an arena. Let's start by creating the Arena scene and saving it as a packed scene to make it ready for instanciation at a moment's notice.
		Create new scene using the + sign: Arena (Node2D) and save it in the Scenes folder
		Set Arena as main scene in Project Settings > Run > Main Scene
You can imagine a roman-style collosseum with gladiators fighting for dear life in front of a throng of enthralled spectators. And you are going to need a lot of that imagination because in the beginning we're just going to use stock art that comes with Godot and doesn't look anything like a collosseum!
The reason I'm not going to use custom art for now is that the stuff that comes with Godot is fine for what I want to work on first, namely core game mechanics.
Cyberglads is going to be an isometric game, or at least that's what I'm shooting for at the moment. This will have a number of implications, but I like the feeling of depth in isometric games even though we're actually still in 2D.
To make the background for the game I'm going to use a tileset that I'm going to organise into an open space surrounded by walls. There's a good tutorial on how to build your own tileset on the Godot engine website, but in the interest of time I'm going to use the tileset from the Isometric game sample project that comes with Godot.
Let's create an isometric TileMap node as a child of the Arena node.
		Create TileMap child node (set position at 900x500)
		Select 'isometric' mode in the inspector
I can choose my tileset by dragging it and dropping it into the Inspector panel. I also need to select the correct cell size. These isometric cells seem to be rectangular but their width is actually double their height.
		From the file system view, drag tileset.tres (from the isometric sample game) into the TileMap 'tiles' property
		Select 128x64 as tile size
Now when I select the TileMap I can paint my background using the tiles from the tileset. Make sure that you've selected 'Show grid' and 'Snap to Grid' so that the tiles fit together nicely.
		In the viewport, select 'show grid' and 'snap to grid'
		Create wall contours first (make sure they fit it in the camera rectangle)
		Then fill the middle with bases using bucket fill tool
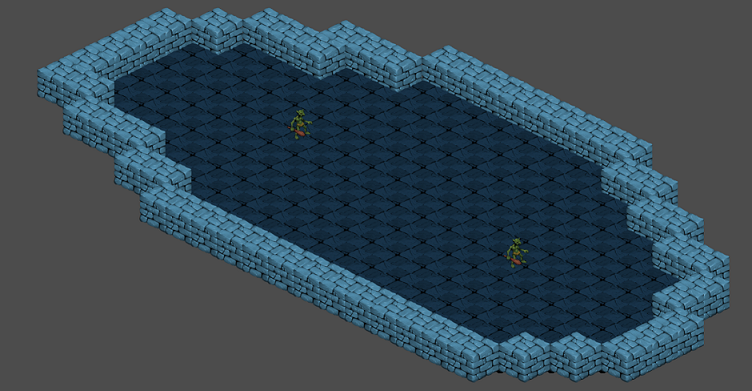
I've just made a bed of base tiles encircled by walls.
Each tile has preconfigured collision properties so that bases can be travelled across but walls and doors are solid. We'll go deeper into tilesets when I create one myself in a later video using custom art.
The Character scene
Now that we have an arena we need contestants. I'm going to create a separate Character scene. Its type will be KinematicBody2D. We'll see why in the course of this video. The reasons involve player-controlled movement and collision detection.
Create the Character scene (KinematicBody2D) and save it in the Scenes folder
We need to add a few children nodes to each character:
- a Sprite node containing the Troll texture (again from the isometric sample game) so we have something to look at
- a CollisionShape2D wth a circle shape so that we can deal with collisions with walls and the opposing character
- an Area2D around the Character, with another CollisionShape2D as a child node. We'll call them MeleeRange and MeleeCollision. We'll make this one a slightly bigger circle shape. We'll see why in a minute.
- and I'll also add an AnimationPlayer node. I'll talk about that in a minute too.
		Add child nodes to the Character node:
		- add Sprite (and add troll image to Texture)
		- add CollisionShape2D (and set shape to circle)
		- add Area2D (called MeleeRange) with CollisionShape2D (called MeleeCollision) child node (also a circle shape, slightly bigger than for the above CollisionShape2D)
		- add AnimationPlayer
Make sure children are not selectable so that we don't inadvertently move any of the Character's child nodes when we move the Character.
Select 'make children not selectable' on the Character root node
We already know we'll have two types of Characters: Players and NPCs. They'll share a number of attributes. Player and NPC will be separate scenes that will inherit from Character. Character itself will never be instantiated, but in Godot if you want to write code you have to attach a script to a node. So we'll attach a script to the root node in the Character scene to create everything that will be common between players and NPCs.
That means we're going to start writing code now. I'll be using GDScript, Godot's default programming language that's heavily based on Python. If you don't want to use GDscript, there are options in Godot like C# and C++, but I'm going to stick with GDscript.
Attach a script to the Character node (and save it in the scripts folder)
Attributes and functions
Each character will have a set of intrinsic attributes, including max health, strength, speed and reflexes. I'm going to set default values here but in practice each instance of a player or NPC character will override these defaults with character-specific values. These are all pretty straightforward: max health is how much damage a character can take before they die, strength will be related to how much damage they can cause, speed is how fast they can travel across the arena and reflexes is how quickly they can attack.
		Add the following GDScript code in the Character script:

		var speed = 80
		var max_health = null
		var max_energy = null
		var reflexes = 4
		var strength = 45
We're going to add max energy here too, even though we won't use it at first. Energy relates to how tired a character is at any point in time. Finally, each character will have an is_ai_controlled flag that will just say whether the ai should do the thinking.
var is_ai_controlled = false
These intrinsic attributes won't change for the duration of the game, but we're also going to add a few attributes that will depend on the game's context. We're going to add one attribute called state with values 0 or 1, that will just indicate whether the character is alive or dead. We'll have a target attribute that will be a handle to the opposing character. I'm also going to include an attribute called is_in_range that will tell us whether the character is correctly placed to attack the other one based on the MeleeCollision shape that we've just created as a grandchild to the Character scene.
		var state = 0
		onready var target = null
		var is_in_range = false
A character will be more than just attributes, it will have functions too, mapping to what the character can do. Let's see - we want each character to be able to move and attack the other character. We want their health to decrease when they take damage, and if they die we want the character to disappear from the arena. So we need at least two functions: attack and take damage.
		func attack():
			var damage = round( (randi()%50 + strength) / 10 )
			target.take_damage(damage)
The attack function is fairly straightforward; it just causes damage to the target. It will be triggered either by manual input (in the player's case) or by the AI in the NPC's case. The amount of damage depends on the character's strength and a random value. Why introduce a random element here? This is an important decision, and really depends what type of game you're going for. I don't want Cyberglads to be a purely skill-based game. I want it to be more of a combat strategy game where players optimize for most probable outcomes in addition to practicing combat skills. I'll speak to that a lot more in the future.
		var health = 0

		func _onready():
			health = max_health

		func _ready():
			_onready()

		func take_damage(count):
			if state == 1:
				return
			health -= count

			if health <= 0:
				health = 0
				state = 1
In the take_damage function, the character's health decreases by the amount of damage inflicted. Note that health isn't the same as max_health. It's a separate variable that starts at max_health, and can never be more than max_health, but it can decrease during the game. So I'm setting health to max_health in the _ready() function that runs when the node is loaded, and I'm decreasing it in the take_damage() function. Note that I'm using an _onready() function called by the ready function. This will help us when we create scenes that extend from Character, because you can't call the _ready() function of a superclass in Godot.
Player and NPC
If the character's health falls below 1, the character dies so its state needs to change from 0 to 1. Also, when the character dies we want to trigger an animation.
Godot has a great animation system - you can animate any property of any node. There's a simple animation tutorial on the Godot website. Here we want our little Troll to disappear when the animation is triggered, so let's select the animation node in the Character scene and start playing with the animation player at the bottom of the screen. We can add keyframes at the start and end of the animation and select the properties on the Character node whose values need to change during the animation.
		In the Character scene, go to AnimationPlayer node.
		In the animation panel, add a new animation and call it 'die'
		Go to the Character node and click on the little key next to Visibility > Modulate and create new track
		Click on the little key again to create a first keyframe at 0 seconds with the fully visible troll.
		Move the animation cursor to 1 second (we want a 1 second long animation)
		Set the alpha (A) channel to 0 in the Modulate property and hit the key again to add a keyframe at 1 second in the animation panel.
		Playtest and save the animation.
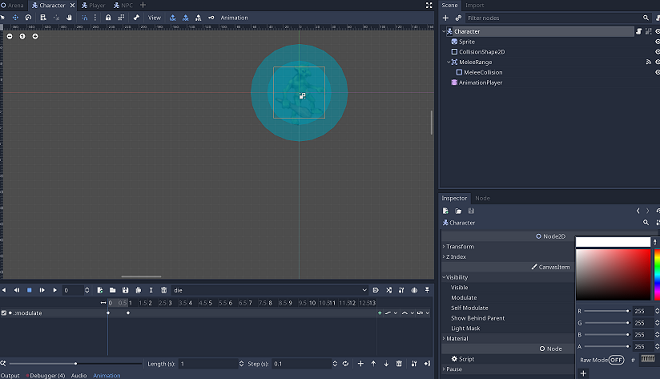
I'm progressively modulating the character's visibility property until the troll Sprite becomes invisible.
Now that we have an animation, let's trigger it when the character dies in the take_damage() function if health is lesser than or equal to 0.
		In the take_damage() function, add:

		# sprite disappears when player dies
		$AnimationPlayer.play("die")
Of course it's not because you can't see the character that it's not there any more. The game is finished when a character dies but for the sake of completeness let's make sure that the character is removed from the node tree using the queue_free() function.
		In the take_damage() function, add:

		queue_free()
Player and NPC
To give life to this game we need to create the Player and the NPC. We have the Character scene that will serve as the base class for both of these, but there is enough that differs between Players and NPCs to warrant separate scenes for each one.
So let's create two new inherited scenes based on the Character scene, and replace their scripts with code to intialize their attributes. By default inherited scenes share the same script as the base class. Here we want the two new scene scripts to extend from the Character script but to have additional code. We can do that by clearing the scripts of the inherited scenes and attach new ones that inherit from the Character script.
Let's create the Player scene.
		Create a new inherited scene based on the Character scene and rename it to Player
		Clear the script on the root node and attach a new script
		The new script should extend Character.gd. Call it Player.gd
		Open the script which should just contain:


		extends "res://scripts/Character.gd"

		Add the following function:

		func _onready():
			target = $"../NPC"
			is_ai_controlled = false
			speed = 260
			strength = 45
			reflexes = 4
			max_health = 18
			max_energy = 18
			._onready()
As I said earlier we can't call the super class's _ready() method but we can call its _onready() function.
And now let's do the same for the NPC scene
		Create a new inherited scene based on the Character scene, rename it to NPC
		Clear the script on the root node and attach a new script
		The new script should extend Character.gd. Call it NPC.gd
		Open the script which should just contain:


		extends "res://scripts/Character.gd"

		Add the following function:

		func _onready():
			target = $"../Player"
			is_ai_controlled = true
			speed = 50
			strength = 45
			reflexes = 2
			max_health = 15
			max_energy = 15
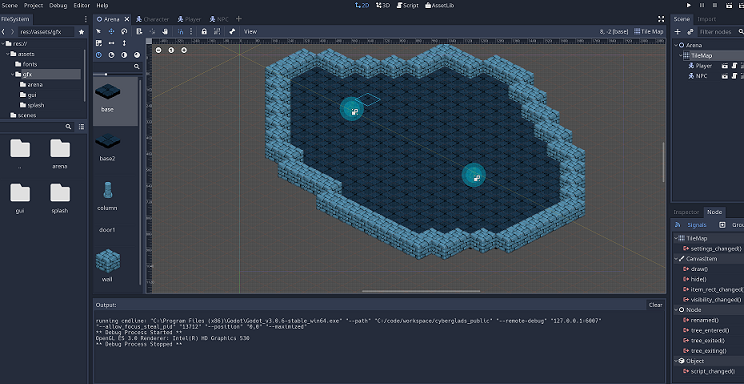
Now let's create two new child nodes under the TileMap node in the Arena scene; one instance of the Player scene and one instance of the NPC scene. Let's place our Player and our NPC inside the tile map that represents the arena.
Add two child nodes to the TileMap node in the Arena scene using the 'instancing' chain-link tool: one instance of Player and one instance of NPC
Should they be able to attack and cause damage to each other while they are standing at a distance from each other like that? Probably not, or at least not until we introduce ranged attacks. It's time to implement movement.
Let's start with the player character. This character will be controlled by the player while NPCs will be computer controlled. I'm going to create a move_on_input() function, triggered from Godot's _physics_process() function.
		Add the following code in the Player script:


		# only for player-controlled characters
		func move_on_input():
			var motion = Vector2()

			if Input.is_action_pressed("ui_up"):
				motion += Vector2(0, -1)
			if Input.is_action_pressed("ui_down"):
				motion += Vector2(0, 1)
			if Input.is_action_pressed("ui_left"):
				motion += Vector2(-1, 0)
			if Input.is_action_pressed("ui_right"):
				motion += Vector2(1, 0)

			motion = motion.normalized() * speed

			move_and_slide(motion)

		func _physics_process(delta):
			if state == 0:
				move_on_input()
The physics process function is called by Godot on each frame, with the value delta equal to the time between frames. The purpose of our move_on_input() function will be to translate movement input from the player into normalized Vector2D objects.
Managing movement by yourself can be demanding but I'm not going to overcomplicate things at first. Godot has some out-of-the-box functions to help you move characters around and decide what happens when they come up against an obstacle. One of them is the move_and_slide() function on KinematicBody2D. I'm going to use it just because it's so convenient. Move_and_slide() lets you control the character's movement and not block them suddenly when they hit an obstacle, which would feel abrupt and artificial. Instead it lets the character slide against the obstacle while movement is underway. The resulting effect is also a little unnatural, but it makes for a more fluid experience in my opinion.
Once again, there's a tutorial around 2D movement on the Godot engine website. Note that you can select which keys you want players to use via the Input Map tab in the project settings menu.
I'm using the arrow keys for Player movement and the enter key for attacking. I'm going to give more options in the future.
Let's go back to collision detection. Remember that in the character's children nodes there are two CollisionShape2D nodes. One is an immediate child and will make sure that the character doesn't move across walls or over another character. But there's another type of collision detection that I'm interested in. I want to know when characters are very close to another one, but not necessarily touching. That tells me that the target is in range of melee weapons and that the character can attack. That's why I have an Area2D with a second CollisionShape2D under the character node, and that's why I made that one a bit larger. I'm calling it the melee collision shape.
Every time the character comes into range of the other character I'm going to send a signal that it is now in range and that it's allowed to attack. So I'm going to find my MeleeRange node and connect signals for the body_entered and body_exited events.
		Select the MeleeRange node in the Character scene and go to the Node tab
		Connect signals for the body_entered and body_exited events, mapping to functions in the Character script
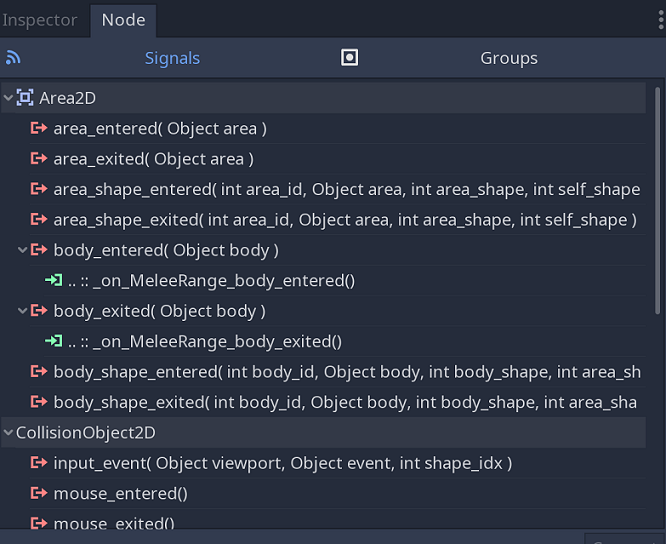
These signals will trigger functions in my Character script. I'm going to set the is_in_range flag to true. And of course when the character is out of range I need to set the flag back to false.
		Add the following code in the Character script:

		func _on_MeleeRange_body_entered(body):
			if body.get_name() != self.get_name():
				is_in_range = true

		func _on_MeleeRange_body_exited(body):
			is_in_range = false
Then I need to test for this range flag in my Player script before the player can attack their opponent. A Player can only attack if they are still alive and in range.
		Add the following code in the Player script:


		# only for player-controlled characters
		func _input(event):
			if event.is_action_released("attack") && state == 0 && is_in_range:
				attack()
I can now move the Player character up against the NPC and attack it until it dies. When it does the animation kicks in and the NPC Troll Sprite disappears.
We've touched on quite a lot of concepts so I'm going to stop here for this video.
If you want to get a sneak preview of the game, head over to cyberglads.com and download the latest version of the game. The binary on the website is slightly ahead and already has a first working game including combat with NPCs. In the next few videos I'll show you how we get from here to there.
That's it for this edition of Making Cyberglads. If you enjoyed it I'd love to hear from you.